

Crafting the Iconic Map from The Lord of the Rings.
I have been a fan of J.R.R. Tolkien for decades. I love to immerse myself in the world of The Hobbit and The Lord of the Rings. There is such depth and detail. The scope of the work still amazes me. One author (and later his son Christopher) working for decades to create a world complete with mythology, languages, a detailed history and rousing adventures. I really enjoy all the maps Tolkien and Christopher created for the books. I’d follow along as characters made their way across Middle Earth. Later, I would buy posters of those maps and eventually draw a few myself.
Fast-forward to December 2001. The first film of the Rings trilogy, The Fellowship of the Ring, hit theaters. It exceeded my expectations on many levels. And as Gandalf was walking through Bag End, what does he find? The map that started it all for me from Tolkien’s The Hobbit. The map was a key element from Bilbo Baggins’ first adventure as part of a company of dwarves seeking to win back a treasure from the ferocious dragon Smaug. The map shows a secret entrance into the lair of Smaug deep inside the Lonely Mountain. It was a great moment seeing the map in that film and I decided to create a version for myself.
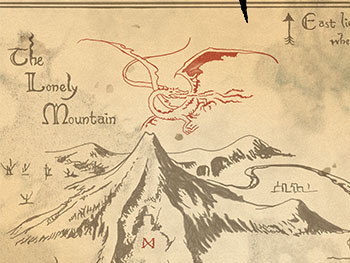
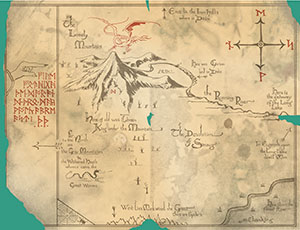
The original map, as seen at the top of this page, was drawn by Tolkien himself for the first edition of The Hobbit in 1937. It depicts the mountain and surrounding features – some of which are dealt with in the book such as the spiders of Mirkwood. And, as was the dwarf custom, east is at the top rather than north. A hand at the left points to the location of the hidden door in the face of the mountain. The letters (runes) near the hand describe the size of the door and the outlined runes toward the middle represent moon letters (runes only seen when the moon shines behind them) which tell how to find the door. This map was redrawn by Daniel Reeve for The Fellowship of the Ring. Daniel initially kept true to Tolkien’s original while adding some red to the dragon, the runes and the compass points. He also aged the map to look like a one hundred sixty-one-year-old document. 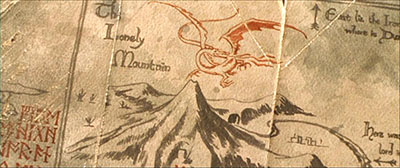 Director Peter Jackson loved the map and filmed the scene with Gandalf examining it. Then he had an idea. He wanted an insert shot with a close-up of the map showing the Lonely Mountain and the dragon and asked Daniel to change those features to be more visually interesting, as seen in this shot from the film. Daniel turned in his revised map and Jackson said, “Great, now I need two different sizes.” Even though the map was never handled by anyone other than actor Ian McKellen as Gandalf, in case the prop would be seen next to an actor playing a hobbit, the map would have to appear larger to show the size difference between humans (or wizards) and hobbits. Numerous props and costumes were created in both scales and the map was no exception. Daniel’s original version of the map is still visible in the film if you look quickly.
 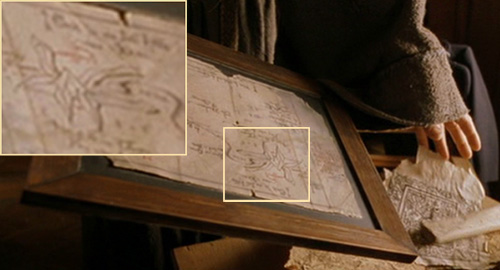 Here’s the scene from the film where Gandalf first picks up the map. The inset image is rotated and enlarged and you can clearly see the mountain is a close match to Tolkien’s original.
The revised map was the version I chose to replicate. It had the most screen time and I liked the revisions to the dragon and the mountain. But finding reference material was going to be tough. Now, obviously the new mountain and dragon can be seen in the film, but the remainder of the map is not seen clearly. So, in my usual working method, I collected all references I could find. When I’d find a new image, I would add it to a Photoshop file that became a patchwork of all references overlaid on each other. I finally had enough to see a complete map. And, the work paid off. I could see that other replicas of this map simply redrew Tolkien’s original and substituted the new mountain and dragon. 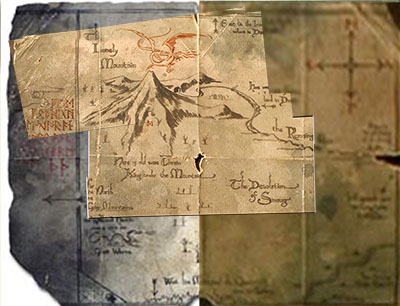 Not a bad idea, since those were clearly the most obvious changes. But my research proved that there were numerous other changes that were more subtle. Many items were resized and repositioned. Angles of rivers, placement of text, even the size of the compass were different. Also, the text style used had a bit more flourish than Tolkien’s original. I was determined to replicate Daniel’s version with as many of his changes as I could verify.
I created this map directly on top of my references file with several custom brushes in Photoshop. Everything needed to look as though it had been created with fine brushes or pen and ink. I used overlapping strokes with differing levels of opacity on much of the larger graphics – particularly the Lonely Mountain. I made my way through every element of the map and finally had a pristine version of the film prop as seen below. I had planned to get it printed and weather it by hand. 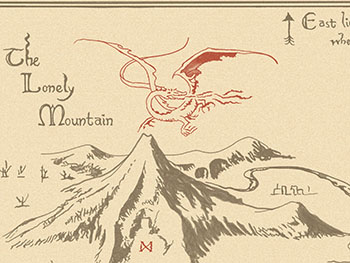
 I had a couple tests printed on heavy, fine art paper and began weathering tests. I became frustrated very quickly. I was simply not talented enough to replicate the distinct edges and varying shades of aging on the map. The weathering itself almost seemed to be part of the artwork. So, I decided to use that approach. Weathering that involved stains, streaks and dirt, I would create as separate layers of the Photoshop file. Weathering that was dimensional such as tears and fold and scratches, I would add to the map after printing. So, back to Photoshop. The weathering took about as long to create as the original map graphics. But, it was worth it. On the left you can compare the same section of the map before and after the weathering layers. The weathering patterns were now a really close match to the original. A few more test prints and color adjustments and it was complete. Below is the final map as printed. The green areas indicate material to be removed to duplicate the rips and tears on the screen-used map.
All that remained was to add in the tears, folds and scratches seen on the original. I cut away most of the green paper with a matte knife and then used a Dremel to slowly grind away the remainder so I ended up with a worn edge rather than a nice crisp cut. I carefully made all the folds in the map and lightly sanded the edges to age them. Then I added the scratches and abrasions seen in the upper corners and on the left hand side. The final, weathered map is seen below.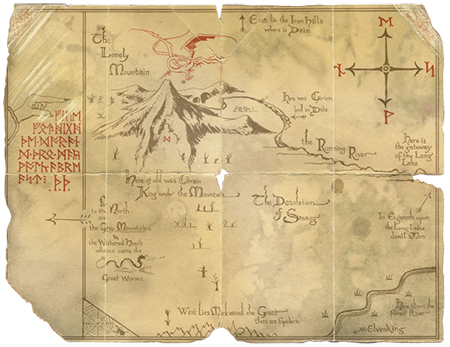
Maps are available for purchase through the Metropolis store at etsy.com. Just click the Etsy button below.

Leave A Comment